FHSU GlobalProtect VPN
Return to Internet / Wireless Information
Do you need access to network drives, databases, or Lotus Notes while off-campus? Do you want to secure your Internet traffic while using a public hotspot? GlobalProtect makes that possible.
GlobalProtect is an application that creates a secure "tunnel" between your computer and the FHSU campus network over the Internet allowing your computer to think it's on-campus.
Let's say you're off-campus and need access to your H: drive. Simply connect GlobalProtect first, then open your H: drive as you normally would. When you're done, disconnect GlobalProtect. These same rules apply for any other remote resource you need access to.
Duo is required to use GlobalProtect.
- Verify you have Internet access (e.g., open any website).
- Click the GlobalProtect icon > Connect.
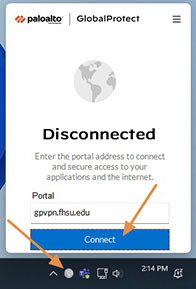
- Enter your TigerNetID username and password.
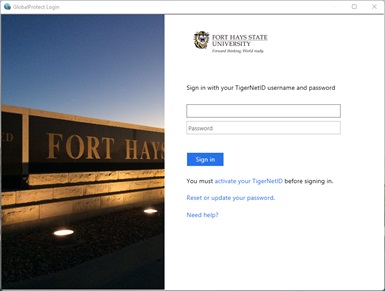
- Complete the Duo authorization request.
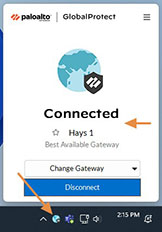
- When the status changes to Connected (the globe will also turn blue), you can access your files / applications normally as if you were on-campus.
When you're finished:
- Close all network drives and files.
- Click the GlobalProtect icon > Disconnect.
- Reboot your computer.
(This allows any pending OS updates to install, which would otherwise interfere with installation.) - Open an Internet browser and go to https://gpvpn.fhsu.edu.
- Log in with your TigerNetID username and password.
- Download and then install the Windows GlobalProtect agent.
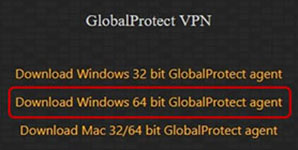
(If the 64-bit agent will not install, you can try the 32-bit agent.) - When installation is complete, a grey globe icon will appear in your taskbar.

- Click the globe icon.
- For portal address, type: gpvpn.fhsu.edu
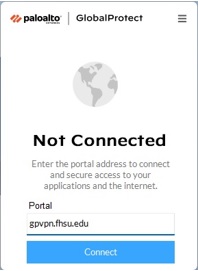
- Click Connect. Enter your TigerNetID username and password.
- In a moment, the status will change to Connected and the globe will turn blue.

- You may now access things as if you were on campus.
- From an Internet browser, go to https://gpvpn.fhsu.edu.
- Log in with your TigerNetID username and password.
- Download the Mac 32/64 bit GlobalProtect agent installer.
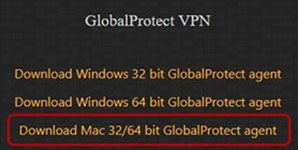
- Run the installer (GlobalProtect.pkg).
- Proceed through the installer, leaving the default options selected.
- After the installation, you will be prompted to enable a security extension.
- Click Open Security Preferences.
Or open System Preferences > Security & Privacy > General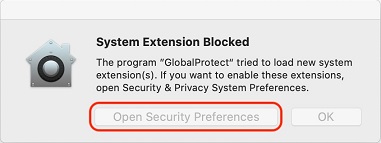
- Click the Padlock to unlock, then click Allow.
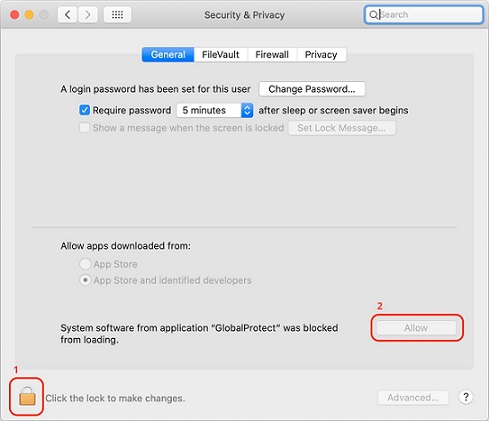
- Click Open Security Preferences.
- When installation is complete, a grey globe icon will appear in your menu bar.

- Click the grey globe icon.
- For portal address, type: gpvpn.fhsu.edu
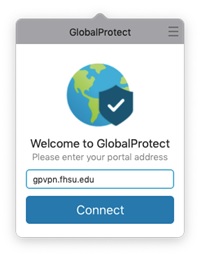
- Click Connect. Enter your TigerNetID username and password.
- You may be prompted to allow GlobalProtect to create a VPN connection. If so, click Allow.
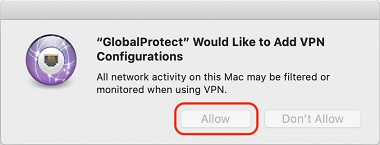
- After a moment, your status will change to Connected. The icon will turn black with a shield.

- You may now remotely access campus resources.
- Download the GlobalProtect app from your device's app store:
- Open the GlobalProtect app.
- For portal address, enter: gpvpn.fhsu.edu
- When prompted, enter your TigerNetID username and password.
- Wait for status to change to Connected.
- Press the Windows key, then type Remove.
- Click Add and Remove Programs.
- Select GlobalProtect > Uninstall.
- Please reboot your computer if you plan to reinstall GlobalProtect.
- Download and run the installer again.
- Click Continue, and then select Uninstall GlobalProtect.
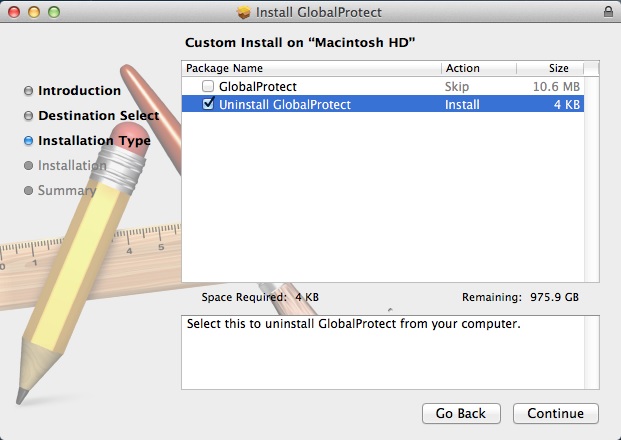
- Click Continue.
- Please reboot your computer if you plan to reinstall GlobalProtect.
Remove GlobalProtect like you would any other app from your device. If you're unsure how to do this, please contact your phone manufacturer for assistance, as it is different for some phones.
Signing out of GlobalProtect is useful if you have changed your password or need to sign in with a different account. By following these steps, GlobalProtect will request your username and password the next time you connect.
- Click the GlobalProtect icon.
- Click the menu icon ☰ > Settings.
- Click Sign Out.
- Click OK.
- If you're already having wifi or Internet performance issues, GlobalProtect will be slow, prone to disconnect, or may never connect at all. Please make sure your wifi and Internet are fast and stable. You may try rebooting your wifi router or contacting your ISP in this situation.
- Try leaving it connected for a little while. We've seen where some computers try to sync massive amounts of data over your Internet connection after they detect being reconnected to campus. It may take a few minutes for this to stabilize. If you find yourself running into this often, contact Tech Services because something needs to be checked out.
- Open System Preferences > Security & Privacy > General.
- If you see a message stating that "GlobalProtect" was blocked, click Allow.

- If the Allow button isn't going away, you may need to uninstall and reinstall GlobalProtect, and then try clicking Allow again.
- If you haven't already, try again after rebooting your computer.
- If still having issues, uninstall GlobalProtect, reboot, and reinstall.
- If issues persist, please contact Tech Services.
- First, make sure you are connected to the VPN before doing anything else, and then try your app again.
- Ask a coworker: Is it working for them?
- Please put a request in with Tech Services describing the application and behavior, including any error messages.
- Click the spotlight icon or press Command Key
 + Space.
 - Type Global.
- Click GlobalProtect.
- The icon should return to the menu bar.
- If not, try rebooting your computer. If rebooting does not resolve the issue, you may need to uninstall/reinstall GlobalProtect.
- Press the Windows Key.
- Type Global.
- Click GlobalProtect.
- The login interface should appear.
- If the icon remains hidden:
- In the bottom-right of the taskbar, look for an upwards facing arrow (^). If you see the arrow, click it and see if the globe icon appears in the box that comes up.
- You can drag the icon to the taskbar to keep it from hiding again.
- If the issue is still not resolved, try rebooting the computer. If rebooting does not resolve the issue, you may need to uninstall/reinstall GlobalProtect.
If you are connecting from your personal computer, you will need to map the network drives manually.
Contact TigerTech
Live ChatPhone
785-628-3478
Walk-in Assistance:
Tomanek Hall 127
Hours:
Mon-Fri: 7:30am - 4:30pm